Quick Facts
- Primary Targets: Latissimus dorsi, rhomboids, and trapezius.
- Efficiency Rating: Ranked #1 for middle/lower trap and erector spinae activation according to ACE research.
- Torso Angle: Aim for approximately 45 degrees; avoid exceeding a 15-degree rise during the pull.
- Safety Threshold: High lumbar compression of 3,576 Newtons makes neutral spine alignment non-negotiable.
- Strength Benchmarks: Targeted 1RM averages are 80kg (176lb) for males and 42.5kg (94lb) for females.
- Equipment: Standard Olympic barbell, plates, and optional lifting straps for grip fatigue.
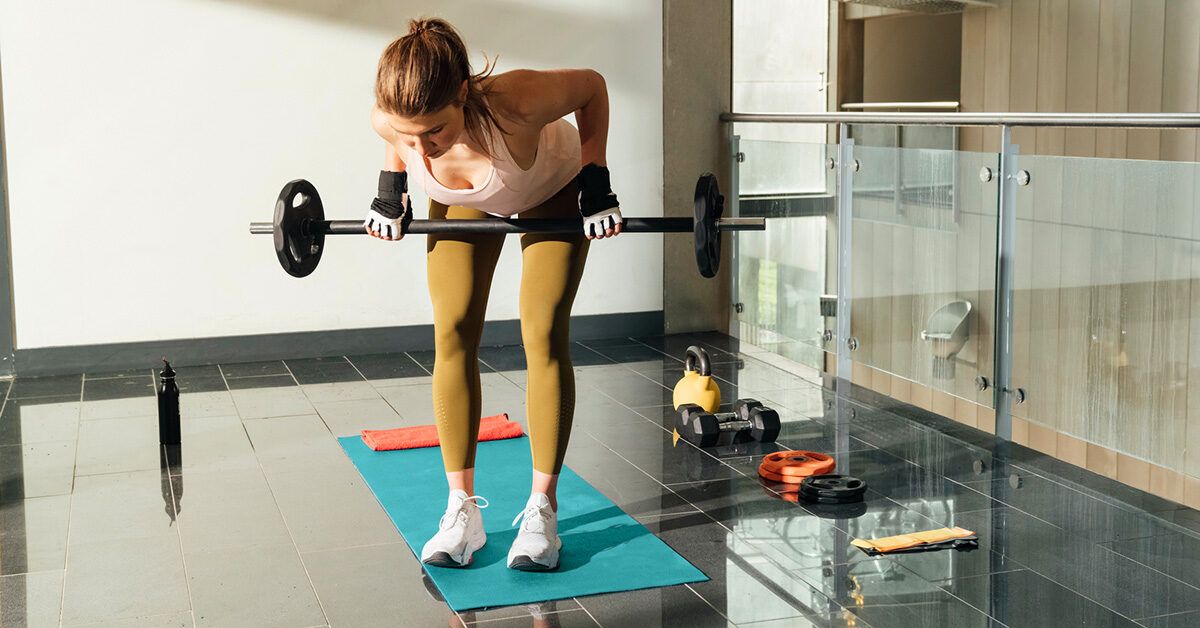
The bent over row is a primary compound exercise that targets the latissimus dorsi, trapezius, and posterior deltoids. Proper barbell row form requires a solid hip hinge with a neutral spine alignment and core bracing technique to protect the lower back and maximize lat activation.
If you are looking to build a back that looks like a topographical map of the Andes, you cannot ignore horizontal pulling mechanics. While the pull-up is often heralded as the king of back width, research sponsored by the American Council on Exercise (ACE) suggests that the bent over row is actually the most effective overall back exercise because it activates three of the five major back muscles—the middle trapezius, lower trapezius, and erector spinae—to the highest degree among eight tested variations.
As a performance editor, I look for movements that provide the highest return on investment. The bent over row is a high-threshold movement. It demands stability, coordination, and raw pulling power. However, it is also one of the most frequently butchered lifts in the gym. From "T-Rex rows" with limited range of motion to excessive torso swinging, the potential for error is high. Master this lift, and you master your posterior chain.
Anatomy of the Row: Muscles Worked
To understand why this move is so effective, we have to look at the barbell bent over row muscles worked primary and secondary. This is not just a lat exercise; it is a full-body stabilization challenge.
The primary movers are the latissimus dorsi, which drive the humerus back and down. Working in tandem are the rhomboids and the middle and lower trapezius, which facilitate scapular retraction—the act of pulling your shoulder blades together. Without proper scapular retraction, you are simply performing a glorified bicep curl.
The bent over row muscles worked also include significant secondary contributors. Your posterior deltoids assist in the pull, while the biceps brachii and brachialis provide the necessary elbow flexion. Perhaps most importantly, the erector spinae, glutes, and hamstrings act as stabilizers. Because you are holding a hinge position against gravity, your lower back is under constant isometric tension. This builds a level of erector spinae stability that carries over directly to your deadlift and squat.
Building muscle hypertrophy in the back requires a mix of vertical and horizontal pulling. The row provides the thickness—the "3D look"—that vertical pulls often miss. By emphasizing the eccentric phase control, you create the mechanical tension necessary for long-term growth.
Master the Movement: A Head-to-Toe Checklist
For those seeking proper barbell bent over row form for beginners, the setup is everything. You cannot fix a bad lift once the bar has already left the floor. Follow this technical checklist to ensure your biomechanics are optimized for growth and safety.
- Feet: Set your feet shoulder-width apart with a slight 30-degree outward angle. This creates a stable "tripod" base and allows for better hip hinge mechanics.
- The Hinge: Push your hips back as if you are trying to close a car door with your glutes. Your knees should be slightly bent, but the movement comes from the hips.
- Torso Angle: Aim for a torso position between 45 degrees and parallel to the floor. A biomechanical analysis of rowing variations found that the standing bent over row generates a lumbar spine compressive force of approximately 3,576 Newtons. Maintaining a consistent angle is vital for managing this load.
- Grip: Place your hands just outside your knees. A comparative study on grip width demonstrated that using a wide grip of 150% biacromial width elicits significantly greater latissimus dorsi muscle activity than a narrow grip of 100% biacromial width.
- Spine: Maintain a neutral spine alignment from your tailbone to your skull. Do not look up at the mirror; look at a spot on the floor about three feet in front of you.
- The Pull: Drive your elbows toward the ceiling, pulling the bar toward your lower ribs or navel. Avoid pulling to the upper chest, as this can cause shoulder impingement and reduces lat involvement.
- Bracing: Use a core bracing technique. Inhale deeply into your abdomen before the pull to create intra-abdominal pressure, which supports the spine.
Grip Dynamics: Overhand vs. Underhand
One of the most common questions I receive is about the bent over row overhand vs underhand grip benefits. While both are effective, they shift the emphasis of the movement based on the plane of the pull and the degree of external rotation at the shoulder.
| Feature | Overhand (Pronated) Grip | Underhand (Supinated) Grip |
|---|---|---|
| Primary Muscle Focus | Upper back, rhomboids, rear delts | Lower lats, biceps |
| Elbow Position | Flared out (45-60 degrees) | Tucked close to the ribcage |
| Bicep Involvement | Moderate | High |
| Range of Motion | Slightly shorter | Slightly longer |
| Shoulder Health | Focuses on retractors | Higher risk of bicep tendon strain if too heavy |
The overhand grip is generally superior for bent over row variations for upper back thickness. It allows for a wider hand placement, which, as we noted, increases latissimus dorsi activation. The underhand grip, popularized by Dorian Yates, allows the elbows to stay closer to the body, which can provide a deeper stretch for the lower lats but puts significantly more stress on the biceps. If you choose the underhand version, be wary of using "momentum" to jump the weight up, as this is a common cause of bicep tears.
Variations and Progressions for Maximum Growth
Once you have mastered the standard lift, you can implement bent over row variations for back development that target specific weaknesses or accommodate physical limitations.
The Meadows Row
Named after the late John Meadows, this is a Meadows row landmine variation for lat development that uses a staggered stance. Because the weight is on a pivot, it allows for a unique arc of movement and an incredible stretch at the bottom of the rep. It is a unilateral movement, meaning it helps solve muscle imbalances and increases core stability as you fight to stay square.
The Pendlay Row
Unlike the traditional row where the bar stays in the air, the Pendlay row starts and ends on the floor for every rep. This requires the torso to stay strictly parallel to the floor, eliminating momentum and forcing the upper back to do 100% of the work. It is an excellent choice for developing explosive power and horizontal pulling mechanics.
Chest-Supported Rows
If you are struggling with how to prevent lower back pain during barbell rows, the chest-supported row is your best friend. By lying prone on an incline bench (set to 30 or 45 degrees), you remove the requirement for erector spinae stability. This allows you to isolate the back muscles without being limited by lower back fatigue.
The RDL-to-Row Combo
For athletes, combining the Romanian Deadlift (RDL) with a row is a masterclass in posterior chain strength. You perform an RDL to the mid-shin, hold the hinge, perform a row, and then return to a standing position. This creates massive time under tension for the hamstrings and glutes while hitting the back.
Safety Warning: The high lumbar compressive force (3,576N) means that form should never be sacrificed for weight. If your torso rises more than 15 degrees from your starting position, the weight is too heavy.
FAQ
What muscles do bent over rows target?
The bent over row primarily targets the latissimus dorsi, rhomboids, and middle/lower trapezius. Secondary muscles include the posterior deltoids, biceps brachii, and brachialis. Additionally, the erector spinae, glutes, and hamstrings work isometrically to stabilize the body in the hinged position.
How do I perform a bent over row with correct form?
Begin with a hip hinge, pushing your glutes back until your torso is at a 45-degree angle. Keep a neutral spine alignment and a firm grip on the barbell at approximately 150% of your biacromial width. Brace your core and pull the bar toward your lower ribs by driving your elbows back, ensuring you reach full scapular retraction at the top of the movement.
Why do bent over rows hurt my lower back?
Lower back pain during rows is usually caused by a loss of neutral spine alignment or poor hip hinge mechanics. If you round your back, you shift the load from your muscles to your spinal discs. Furthermore, because the row generates high lumbar compression, insufficient core bracing technique can lead to instability and strain.
What is the difference between overhand and underhand grip for rows?
An overhand (pronated) grip typically emphasizes the upper back, rhomboids, and rear delts while allowing for a wider grip width. An underhand (supinated) grip increases bicep activation and allows the elbows to stay closer to the torso, which can shift more focus toward the lower fibers of the lats.
What are the best alternatives to the bent over row?
If you have lower back issues, the best alternatives are chest-supported rows or seal rows, which provide external support for the spine. For those seeking similar compound benefits, the one-arm dumbbell row or the Meadows row landmine variation for lat development offer excellent muscle hypertrophy potential with slightly less spinal load.